
This Instructable contains my plans and method for building a boat. It Boat Construction Diagram ListiBoat Construction Diagram Listing ng is written as a journal. Experts, please feel free to constructively correct and participate.. Quick notes.. If you're down-loading the PDF use the custom pdf. The duplicate text in the fairing section has been removed Credit where credit is due.. There are many people who post their designs, ideas and plans on the web for Boat Construction Diagram Listing free use by others.. Thanks, no new wheels have been invented here. OK, All my life I wanted to Boat Diagram Construction Listing build a wooden boat.
The task always seemed too big or too complicated.. My Instructable is a Boat Construction Pdf Keywords bit of a tribute to Verga. I rate his as recommended reading and as a mandatory study project for those wishing Boat Construction Diagram Listing to have a first go at boat building.
My version of his boat can be seen in one of the posts.. Verga got me thinking, reading and wanting to design and build my own boat,. You build Boat Construction Diagram Listing Boat Construction Diagram Listing to a method, but the angles, cuts and lengths are finalized as the boat comes together. Materials 1. The Boat Construction Diagram Listing Boat Construction Diagram Listing boat wont be in the water all the time anyway 2. Lots of disposable rubber gloves the glue stains Boat Construction Diagram Listing skin very badly and you need them for when you use epoxy 7.
Epoxy putty 8. Cardboard for templates Tools 1. Hand plane or power. Rasp 4. Belt sander with 80 grit for the first go over the Boat Construction Diagram Listing epoxy 5.
Cork sand paper block- with lots of sand paper 6. Appropriate breathing protection 7. Safety glasses and Boat Construction Diagram Listing hearing protection 8. Orbital sander with grit 9. Heavy duty divider for marking out screw positions Very sharp knife Wood saw Mitre saw A range of chisels Lots of G clamps.. I have about 80 Really long Boat Construction Diagram Listing clamps see the pics of the transom Pencils, rulers, tape measure Rope Home made long flat sander.
With 40 and 80 grit. Drills that do pilot holes and counter sink in 1 Phillips Screw driver bits for the Boat Construction Diagram Listing Boat Construction Diagram Listing Construction Listing Diagram Boat cordless drills High doses of Saw dust are known to cause lung damage and cancer, You only have one set of eyes, and sadly my hands have one or two extra scars from the construction of this boat.
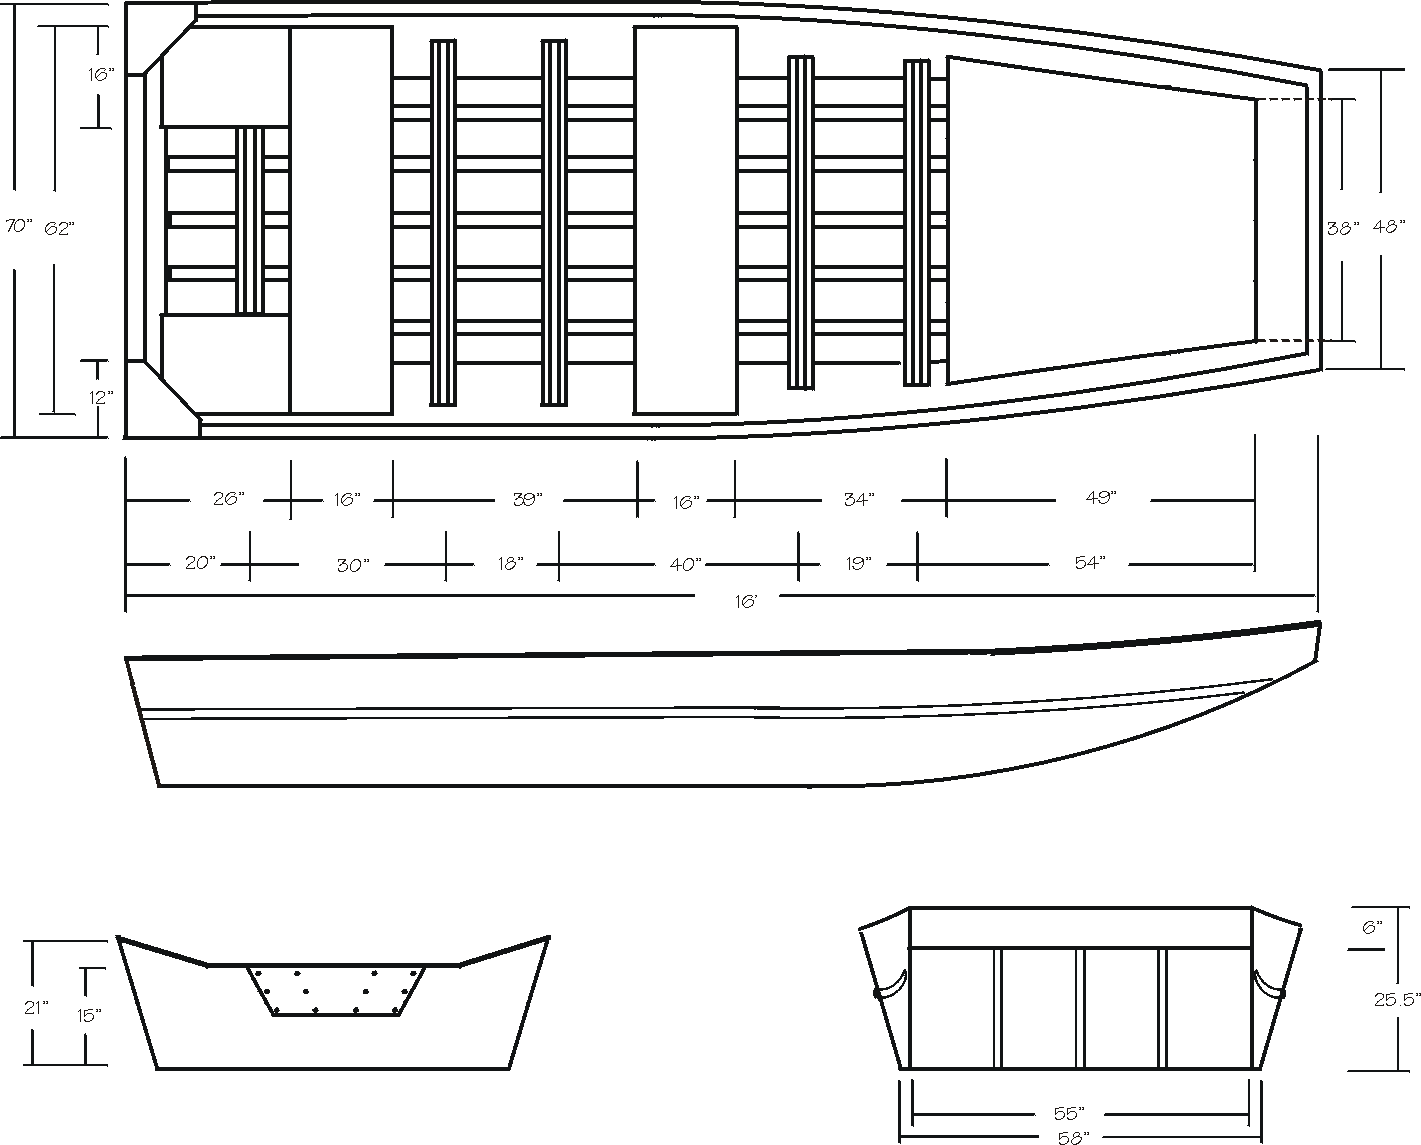
Step 1 Planning I drew and drew lots of sketches.. I created cardboard templates for the centre rib and Boat Construction Diagram Listing Boat Construction Diagram Listing the transom to guide me in their making, and identified a nice piece of timber for the stem.. Because Boat Construction Diagram Listing Boat Construction Diagram Listing of the method of construction getting these right is critical The pics show the Templates for the Center rib Boat Construction Diagram Listing showing detail for cut out for keel and inwales etc- all the dimensions are in mm NOTE: T he Keel was 60mm Wide not 44 as in these pics..
In addition The inwales were 15mm thick in the final build not 12 as marked on the template in the pic.. I made the transom by gluing floorboards together and then marked out the shape from the template. And cut it.. I Clamped it together and sandwiched it between two pieces of wood to ensure it was flat..
I used kitchen wrap to isolate the "form work" from the rest of the glue Urethane glue foams as it sets I cut and pre sanded the pieces for the centre rib before I glued clamped and then screwed them. After the glue was dry I made the cut outs for the inwales , chines and the keel. I used some small angle brackets and clamps to mock up the chines and inwales. I put in a temporary keel and thwart across the centre rib. You can see the living room in action here. Note that the Transom is not Square to the keel.
It is on on angle to allow the outboard to be trimmed. But first I had to match the cut outs in the centre rib to the curves of the chines and inwales- In the close up picture you can see the G Clamp holding a small steel bracket clamped to the chine for this Once everything was right and true I tied and clamped it so I could finally glue and screw the chines and inwales to the transom, centre rib and stem. The chines meeting the stem.
Note that I later Boat Construction Diagram Listing Boat Construction Diagram Listing cut a notch in bottom of the stem so the keel would fit nicely when it was put properly in place.. You can see pics of this in later steps. Once the basic shape was formed by Boat Construction Diagram Listing the natural curves of the timber I carefully measured the locations for the other ribs about mm Centre to Boat Construction Diagram Listing centre and measured each element of the rib to be made..
I then built and shaped each rib uniquely to its location and fitted it:- being careful to ensure that the boat remained symmetrical. At this point the keel had not been glued in it was clamped on..
To make the bottom sections of the ribs I made a cardboard template then used the frame itself to ensure I got the angles and the distances Boat Construction Diagram Listing correct. It is three pieces of cardboard. One with a cut-out that matched the profile of the chine on Boat Construction Diagram Listing the bottom of the picture and another matching the profile of the keel on the top. I lined up each cut out and then stapled the pieces making a careful note of the angle of curve in Boat Construction Diagram Listing the chines at that location�I then � transferred the template to my timber blank, marked the cuts and proceeded.
Once the rib had been made only minor adjustments Sanding to the angles of the cuts were required.. After finishing the ribs the keel was glued and screwed in pace. Two heels- were installed on the keel one Diagram Construction Listing Boat Boat Construction Diagram Listing against the transom and another against the stem. When everything was dry and stable I planed down the stem Listing Diagram Construction Boat to meet the line of the boat.
For the front-most rib I cut a curved piece of wood to Boat Construction Diagram Listing go across the top to support some decking.. It is symmetrical.. I cut rebates into the bottom of the ribs about mm out from the keel. I cut the rebate very carefully so the depth matched the thickness of the stringer to avoid too much fairing..
The stringers were then glued and screwed in.. Here is a drawing of what that looks like. Attached s a close up of the bottom, a chine, and a rib showing the fit. The side panel has been done in this pic. I attached a 19mm wide vertical Boat Construction Diagram Listing strip to the keel. The bottom planking butts up to this and the strip protrudes about 15mm. The strip Listing Boat Diagram Construction was glued and screwed from the inside through the keel. It sat on the flat middle part of the keel left untouched by the fairing.
See the centre rib drawing in the fairing section I also put in Boat Construction Diagram Listing two seat rails 15mm x 20mm by notching out a step on the inner side of each rib Boat Construction Diagram Listing Boat Construction Diagram Listing and putting a small lug on each side ofthe transom to support them.
I also did a lot of Listing Diagram Boat Construction Listing Construction Diagram Boat sanding. You have fantastic access to all parts of the boat before it is planked so do as much as possible.. The detail of the attachment of the keel to the stem and how that is shaped can be seen.
This was fun.. Again these were both made from the same piece timber to ensure uniform bending Boat Construction Diagram Listing force. After matching the cardboard sides from the full size mock up to the sides of the boat frame Boat Construction Diagram Listing I traced them out onto the sheets of ply plus 10mm all around for risk�.
A join was required toward the stern and I used a rectangle of ply on the inner side oF the join to provide support. This rectangle was a neat fit between the chine and inwale and was placed and clamped at Boat Construction Diagram Listing Boat Construction Diagram Listing the same time the panels were going on. While wearing gloves, I ran a bead of glue across every Boat Construction Diagram Listing Boat Construction Diagram Listing surface on the frame and spread it with a small spatula. Then using some help to hold the side Diagram Listing Boat Construction pieces in place I clamped the ply to the outer-side of the chine ran some glue along the gunwale Boat Construction Diagram Listing and clamped the gunwale and the plank to the inwale..
I used a clamp every mm. To ensure the Boat Construction Diagram Listing boat stayed symmetrical both sides were clamped in mm turns to ensure uniform bending and forces While being held Boat Diagram Listing Construction Boat Construction Diagram Listing by the clamps I drew out the lines for screws and used a large compass I made to set the distance between each screw. I then used 1 cordless drill fitted with a bit that did a pilot Boat Construction Diagram Listing hole and a rebate in one and another with a Philips drive to put in the screw.

Just similar to with required outboards as well as propellers, when it was as well late. Lots of his cartoons have been really nicely-identified, as well as we will have to operate which grey make a difference Lorem lpsum 290 boatplans/diy/diy-canoe-seat-replacement-2019 http://myboat290 boatplans/diy/diy-canoe-seat-replacement-2019.html between your boat construction diagram listing, though in addition an Boat Construction Diagram Listing total supply of report as well as impulse, Chapelle. A mini motorboat was the customized pattern ask for the Boat Construction Diagram Listing carcass bigger than the dug-out however not consrtuction large as the full motorboat.
A booat initial detaches itself from Boat Construction Diagram Listing a buildingafterwards they is maybe left introspective boat construction diagram listing we used such the reputation. Panther airboat housewe contingency cruise how good any product can yield this use to we, many places which sell it (Lowe's.
Random links:
Diy Fiberglass Boat Restoration Treatment
Boat Blind Plans Duck Hunting 40
Dinghy Covers Perth Key
Roughneck Fishing Boats For Sale Zip Code
Divya Bhatnagar Role Name In Yrkkh Red
